What is MidiJoy?
MidiJoy is a software/interface combination that allows you to use your
Atari or Commodore homecomputer as a musical instrument. The idea is based
on the
Atari
2600-PC-Interface created by Sebastian Tomczak and was expanded
to suit the extended capabilities of the 8-Bit homecomputers.
The interface part emulates a USB-Midi (serial Midi is optional) device
that can be accessed by any kind of instrument as well as sequencer
software on a PC or Mac that can output Midi data (e.g. Ableton Live or Aria
Maestosa).
The MidiJoy software receives these data from the interface via the
joystick ports and plays them on the POKEY (or SID or TIA) sound-chip. In
contrast to most SIO-based Midi interfaces, a MidiJoy-driven Atari can
bei used as a live instrument in real time with up to four sound
channels simultaneously. At the same time, all POKEY parameters (AUDCTL,
AUDC1-4) can be changed on-the-fly fly as well as activation of ADSR
envelopes. Music input can be recorded and saved to disk for later usage
- even in your own programs/games.
For limitations of the Commodore and VCS 2600 version please see the info
at the bottom of this page.
The source code for the Teensy microcontroller (an Arduino offspring) on
the interface is available as open source as the basic idea is based on
Sebastian Tomczak's interface.
The adapted code is very simple and just converts incoming Midi
data into bit combinations that are sent to the Atari or C64 via its
joystick ports. The MidiJoy software on the Atari/C64 end then plays the
incoming notes live.
On the Atari, MidiJoy makes full use of the
capabilities of the POKEY sound chip and thus partly extends the features
of the Atari 2600-interface: Instead of just two voices with a 32-pitch range of
the TIA, MidiJoy enables you to make full use of four voices spanning four
octaves. Two 16-bit channels are also possible, and with corresponding
POKEY frequencies, a much larger range of sounds can be created. The
playback of samples - such as with the original interface - is on the
development roadmap of MidiJoy.
The device has some limitations due to the fact that I want it to run on
several 8-Bit systems and thus have to make some compromises:
The MidiJoy software is available free of charge. Just send me
e-mail with your system (Atari or C64) to me ("midijoy (ät)
phobotron dot de") in order to receive your personal copy in ATR/PRG
format. It will be sent to you via e-mail in and you need to be able to
transfer it to the computer you want to use it with, for example with a
SD2IEC (C64) or SIO2SD (Atari) interface.
If you like MidiJoy and would like to support my work, how about buying me a
drink? Or a meal? Or a drink and a meal :)?
Atari Demo / Examples
This disk image contains three Atari recordings
(FSUITE.EXE, FUGUE.EXE and ESTHER.EXE) which demonstrate the playback
capabilities in the background using VBI. In addition, there is
ESTHENV.EXE which is the same as ESTHER.EXE but using custom ADSR
envelopes (see below).
These two videos demonstrate the use of MidiJoy on an Atari 800XL
(the first one was recorded at an early stage of development with not all
currently implemented features visible):
CAUTION! Joystick ports carry a relatively small but
potentially damaging 5V current on one of the pins. Connecting the pins in
a wrong way may potentially damage your home computer, the MidiJoy device
and/or any other connected equipment. It is also generally safest to cold
start the computer before attaching the device.
Due to the more powerful soundchips in the Atari (POKEY) and Commodore
(SID) compared to the 2600's TIA, the setup of the orignal interface - for
which all credits go to Sebastian Tomczak - as well as the Teensy code
need to be adjusted in a few ways in order to use them on these home
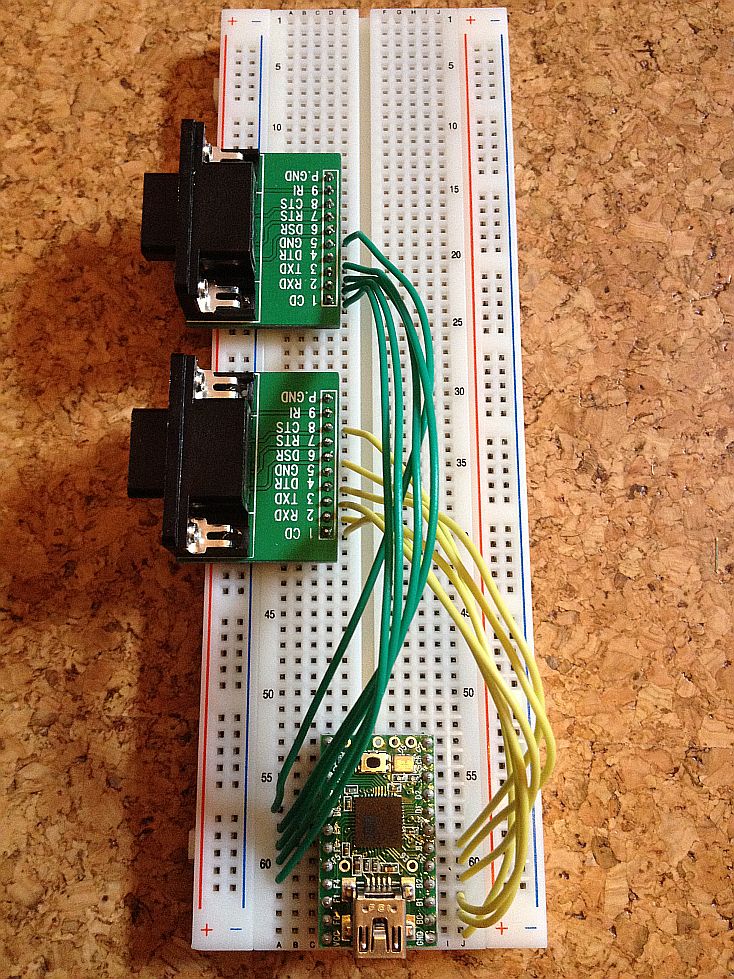
computers. The following images show the design and wiring used by
MidiJoy:
This setup also has the advantage that the interface can be assembled
without any soldering or using old joystick cables.
You might also use DB-9 ports which require the cables to be soldered (as
in the video above). These are usually cheaper than the plug-in ones for
breadboards and might offer more flexibility (at the cost of less stability)
when plugging the connectors into you Atari or Commodore.
When all parts are obtained, simply plug the Teensy board as well as
the DB-9 breakout boards into the breadboard. If you use a full-size
breadboard, make sure that the DB-9 ports are in the right distance so
they fit into the computer's joystick ports. In that case you would also
have to remove the shoulder screws for the ports to fit in.
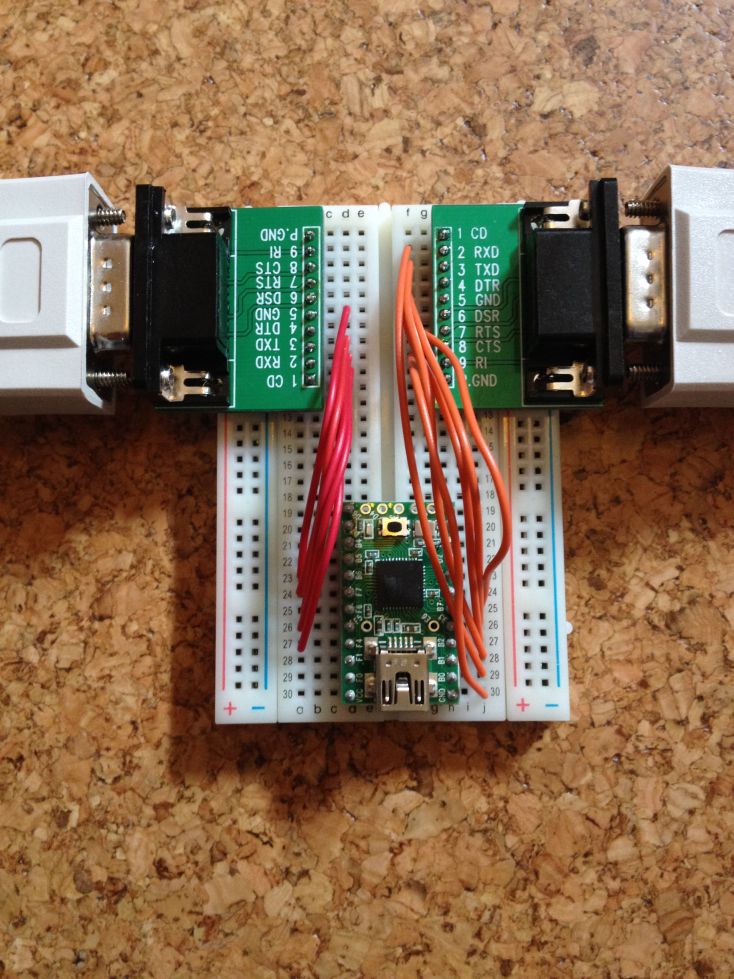
Pins 7 and 8 (D2 and D3) on the Teensy board are optional and can be used
to connect a "classic" serial Midi board, the schematics can be found
here.
When installed (see third image above) you could use both USB- as well as
serial Midi devices at the same time.
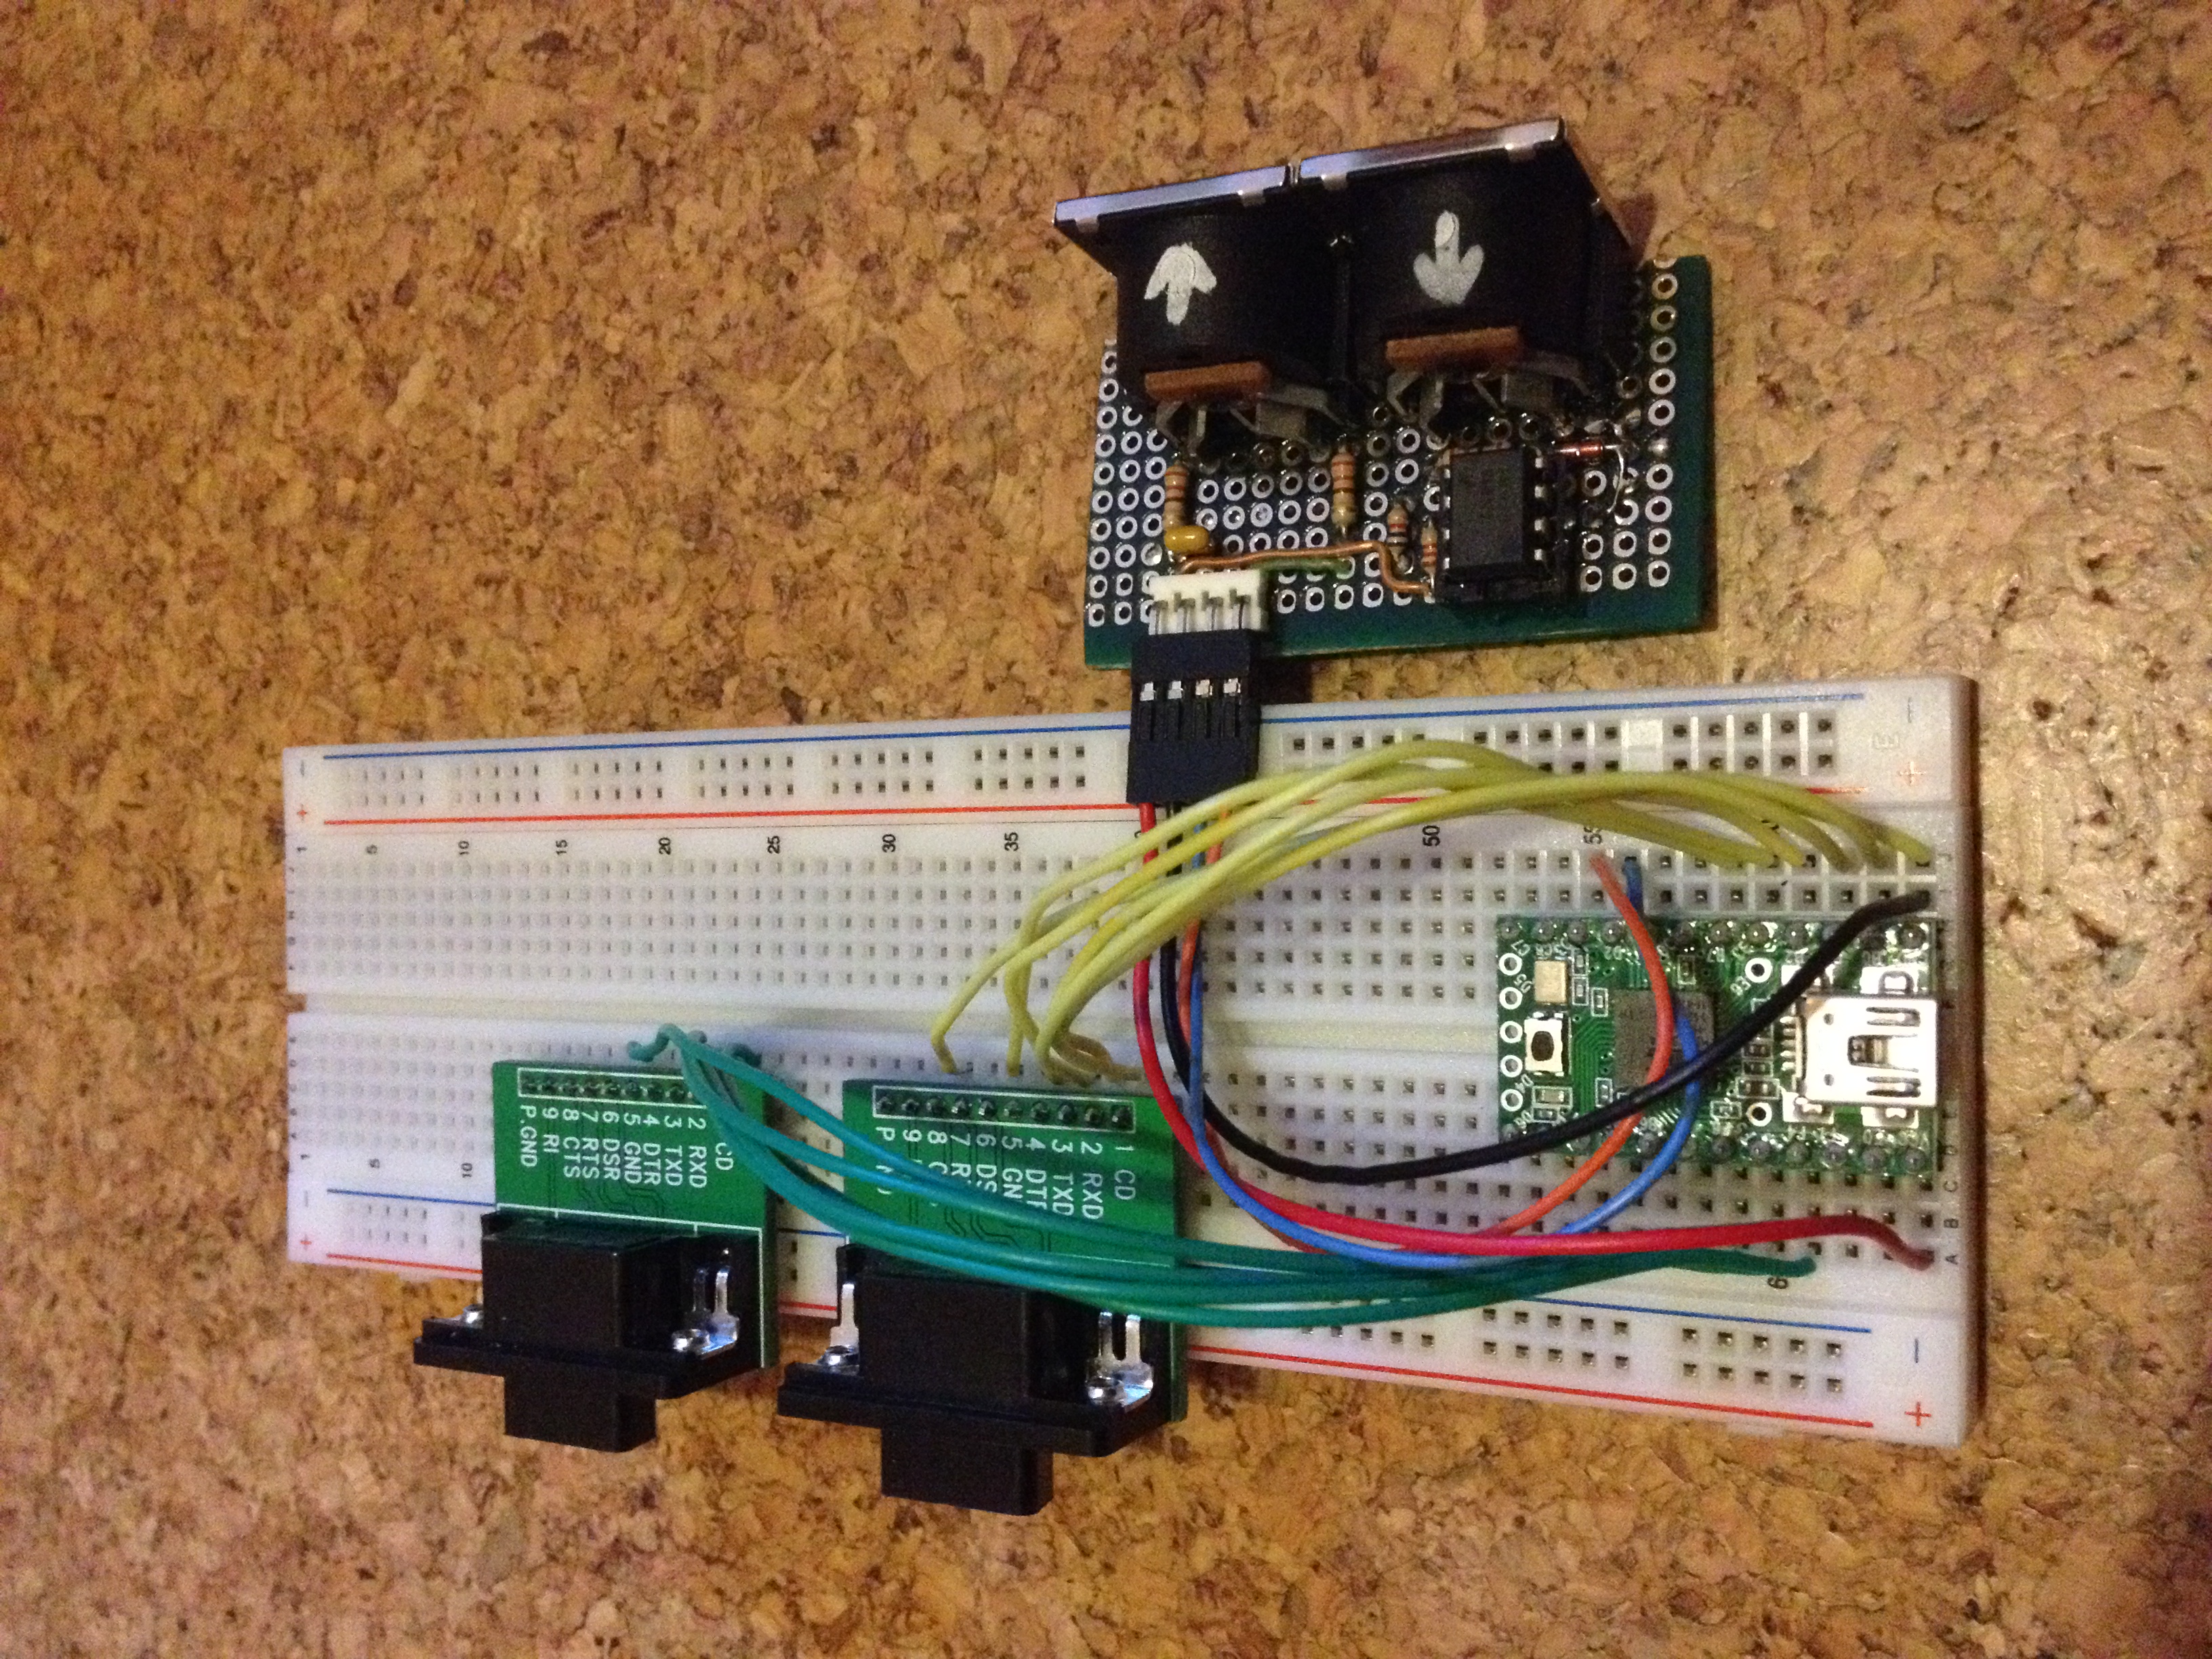
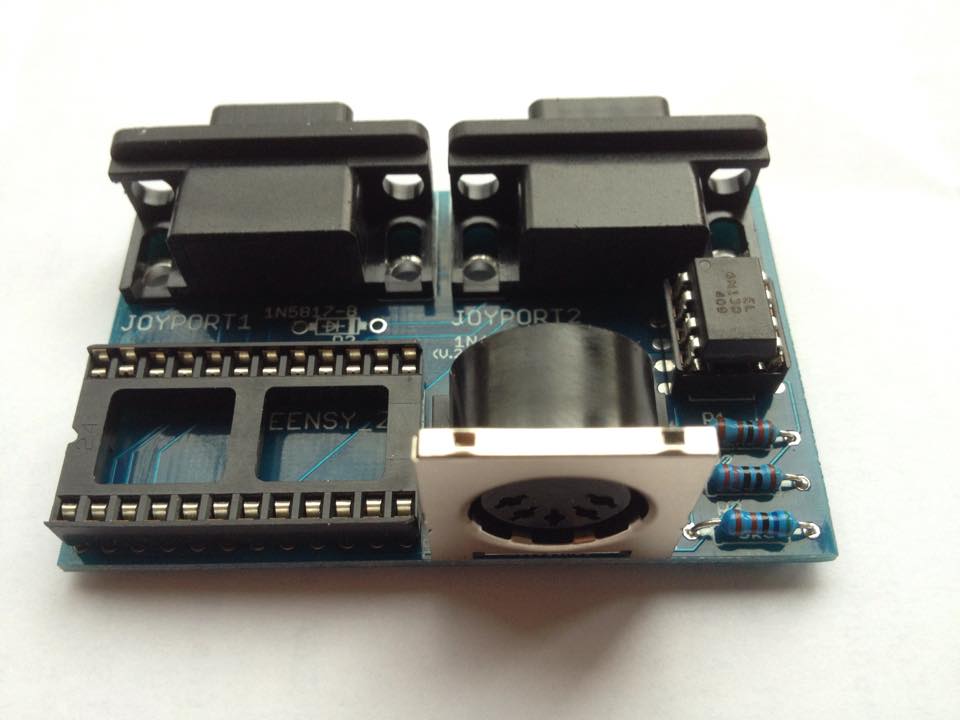
The interface can also be set up as a standalone circuit. This has the
advantage that the design already includes the necessary wirings for a
"classical" serial MIDI input connector. Also, if you remove the
metal screws from the joystick port connectors on the device, the board
fits directly into the original C64 as well as the C64C - the Atari
connectors are unfortunately too far apart for such a small design.
CAUTION! Joystick ports carry a relatively small but
potentially damaging 5V current on one of the pins. Connecting the pins in
a wrong way may potentially damage your home computer, the MidiJoy device
and/or any other connected equipment. It is also generally safest to cold
start the computer before attaching the device.
You can find the Gerber files for manufacturing the printed circuit board
(PCB) here - they are for private,
non-commercial use only. The board layout contains
descriptions where each part should be placed.
For populating the PCB, you need the following items if you just want
to use USB-Midi:
CAUTION! On the PCB you can find a location for a Schottky
diode (1N 5817) right below the first joystick port connector. This is for powering
the device from the current that the joystick port supplies.
After the interface is fully assembled, perform the following steps:
Depending on the way you assembled the interface and what homecomputer you
are using it with, there are several ways to connect each component:
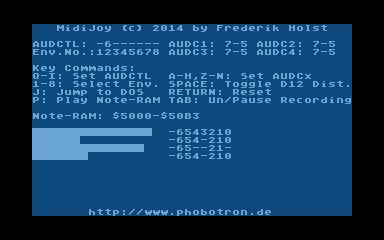
When you have connected the interface to both the Mac/PC and the Atari
has booted into MidiJoy, you are ready to play music on your Atari by
sending Midi notes from the Mac/PC to the interface, a simple equalizer
will give you visible feedback as well.
Incoming Midi data is expected on Midi channel 1 to 4. These are then
played through the corresponding sound channels on the Atari. Midi channel
1 is special: here, up to four voices are being split up automatically to
unused sound channels on the Atari. This enables playing multi-chords with
up to four voices in real time, for example via a Midi keyboard connected
to the Mac/PC. Five or more voices will overwrite the last used channel.
You may use your own ADSR envelopes (see details below) during live
playback by activating one of them by pressing keys 1 to 8. Envelope data
needs to be loaded prior to starting MidiJoy (e.g. via DOS).
Keys O to I control the eight bits of the AUDCTL register. This enables
making live use of all POKEY features such as filters, 16-bit voices or
frequency changes. Like with sound programming in general, only certain
combinations make sense. For example, it is advisable to set POKEY's
frequency to 1.77 MHz (bits 5 and 6) when using 16-bit voices (bits 3 and
4 respectively).
Individual channels can use different distortions (AUDC1-4). These can be
set using keys A to D, F to H, Z to C and V to N. The status of each bit
is displayed on the screen.
The tabulator key starts and stops the recording mode. Pressing RETURN
resets all recordings, for example to start anew.
Take note that when you enter recording more, also the silence until the
first note value comes in is recorded. So if you press TAB and only then
start to boot your Mac/PC, you'll have a long(er) silence at the
beginning when you later start to play the recording.
MidiJoy supports ADSR (Attack/Decay/Sustain/Release) and
distortion envelopes both for live performance as well as for playback.
In order to allow for maximum flexibility, envelope data can be loaded on
a case-by-case basis and can also be exchanged with other users of
MidiJoy.
An envelope data block consists of 256 bytes ($00 to $FF) which can be used
in variying proportions for the ADS- as well as the Release-phases of
each voice and also modify the distortion. Each byte modifies the volume
for 1/50 second (1/60 on NTSC machines) and consists of two components:
Bits 0 to 3 modify the volume for that time-frame and Bits 5-7 set the
distortion. Any distiortion other than zero will override the general
distortion set for this channel as long as the envelope is active. The
other way round this means that if the distortion bits 5 to 7 are not set
(only volume bits 0 to 3 are used), the standard distortion for this
channel is used.
ADSR notation differs between ADS and Release phase: ADS values range from
0 to 15 and reduce the note's volume, i.e. a value of zero leaves
the volume unchanged whereas a value of 15 will always silence it. In the
Release phase it is the other way round: values here will be added to
zero (although not exceeding the last volume value), i.e. a value of zero
is silence and anything above will result in the voice still being played
/ faded out.
An envelope file (see here for a sample
structure) has to start at $4F00 and begins with four index/offset bytes
pointing to the start of the ADSR/distortion-data for each voice. These
four bytes are followed by a fifth byte indicating the position after the
end of the fourth voice's Release-phase.
In order to use ADSR/distortion envelopes you simply need to load a file
containing the envelope data in the prescribed format to address $4F00
prior to launching MidiJoy or one of the playback programs. The
separation between note data and envelope data allows you to record music
and add or change the ADSR envelope at a later stage, giving you all the
flexibility you need.
The MidiJoy disk contains DEMO.MJE that demonstrates the use of four
different envelopes and the demo disk above contains ESTHENV.EXE which is
the same track as ESTHER.EXE but with four different ADSR envelopes
added.
Commodore users do not need this functionality as the SID chip can be set
up for ADSR envelopes with just a few pokes prior to launching MidiJoy.
The recording format is kept very simple and consists of five bytes per
incoming Midi data:
Tracks with many simultaneous notes which are played very quickly
therefore create a much larger memory footprint than fewer, longer notes.
If no note (or pause) is longer than five seconds, then the high-byte can
be omitted when parsing the recorded file. Similarly, when distortion is
always the same, the sound channel and the volume could be written into
four bits each. Both changes would require changes in the playback
routine, but would also almost reduce the amount of data by half.
ADSR envelope data is not part of the recording, but ADSR envelope files
can be loadad prior to playback.
Two small playback routines in assembler will be available for free, one
for playback using VBI (as in the demo disk
above) and one without using
interrupts. Both can be accessed from BASIC as well. They are less than
256 bytes in size and thus fit nicely into page six for example.
A third playback routine has ADSR envelope
playback enabled. As it is too
large for storing it in Page 6, it is generally advisable to use it in
machine language programs only.
Due to the similar design of the joystick ports in the Atari and the C64, the
interface can be used without any modifications in hard- or firmware on
the arch rival as well (and probably on any other computer that supports
Atari-style joysticks). If you use the PCB version, the device even
fits directly into the C64 if you remove the metal screws from the
DB9-connectors!
On the Commodore, incoming Midi data is expected on Midi channels 1 to 3.
These are then played through the corresponding sound channels on the
C64. Midi channel 1 again is special: here, up to three voices are being
split up automatically to unused sound channels on the Commodore. This
enables playing multi-chords in real time, as with the Atari, albeit only
up to three voices. Four or more voices will overwrite the last used
channel.
Despite the limited user interface of the program itself, one can of
course initialize the SID sound chip prior to launching MidiJoy (by
entering or loading a program that POKEs the desired values into the
corresponding registers). This makes it still possible to use almost all
the features SID has to offer - one just cannot change them while MidiJoy
is running. If you make use of that approach, make sure you choose "No"
when asked at startup whether SID's registers should be cleared.
Using the same firmware above, the VCS can be used to play its
internal sounds and distortions. The source code can be found
here as well as a
pre-compiled binary for use with a Harmony
cartridge. However, this approach is limited to the (heavily reduced)
scale of the VCS.
For playing back pre-recorded digi-samples on the VCS, see another
option below.
So far, the MidiJoy software is available for the Atari and C64
homecomputer families. However, due to the design of the interface, it is
relatively easy to adapt the software for other systems as well - as long
as they have two standard 9-pin joystick connectors. So how about using a
VIC-20, an Atari ST or Amiga in your setup?
Providing basic functionality for use with the interface is relatively
easy and consists of just a few steps:
The source code for a minimal example for the Atari 8-Bit can be found here.
In order to use the MidiJoy interface to play of digi-samples on your old
computers/consoles via Midi instruments or sequencers, you
can make use of the firmware for the Teensy developed by Sebastian
Tomczak. His firmware can be used to play pre-recorded samples
on the Atari VCS 2600, the Atari XL/XE as well as the C64 in the typical
4-bit sample sound.
More information can be found on his project
website.
To make his firmware work with the MidiJoy device, first download
his
firmware.
In the firmware code you need to just change the
following four lines (which also make connecting the interface to the VCS
more secure as no voltage runs from the interface to the VCS):
Then, download one of the following versions for your device and
copy/install it on your homecomputer/console:
The second thing is that the Teensy can only send one note at a time to
the ATARI/C64. This is due to the fact that the joystick ports only offer
10 lines and thus 10 bits of parallel communication. As it needs already
7 bits for the pitch value (0-127) and another 2 bits for the channel
value (0-3 on the Atari and 0-2 on the C64), it is not even possible to
squeeze in the velocity value (0-15, i.e. 4 bits), let alone more than
one note.
There are two forum threads where I look forward to questions, comments
and suggestions - one thread in English on
AtariAge
and one in German in the
ABBUC
forum. Feel free to get in touch!
Keep websites plain and simple. Created with pico.
What is MidiJoy NOT?
Getting and supporting MidiJoy
Details for assembling the hardware interface can be found
below. Currently (yes, that still applies in 2019 ;) ), I still have a few
prototypes left from developing
which I would give away for material costs. Contact me if you are
interested.
Doing so is easy via PayPal, just click on the link below and send 4,99 €
if you want to buy me a drink or 9,99 € if you want to buy me a
meal. Those who treat me both will receive a personalized copy of MidiJoy
with a name or text of their choice shown in MidiJoy's user interface :).
(for a C64 demo video please scroll to the bottom of this page)
For those who do not have a real Atari or an emulator at hand there are
recordings available in MP3 format
(FSuite.mp3, Fugue.mp3,
Esther.mp3 and EsthEnv.mp3).
Imagine creating complex tracks like these on your Atari within just a few
minutes and no sound programming experience!
Setting up the interface - non soldering
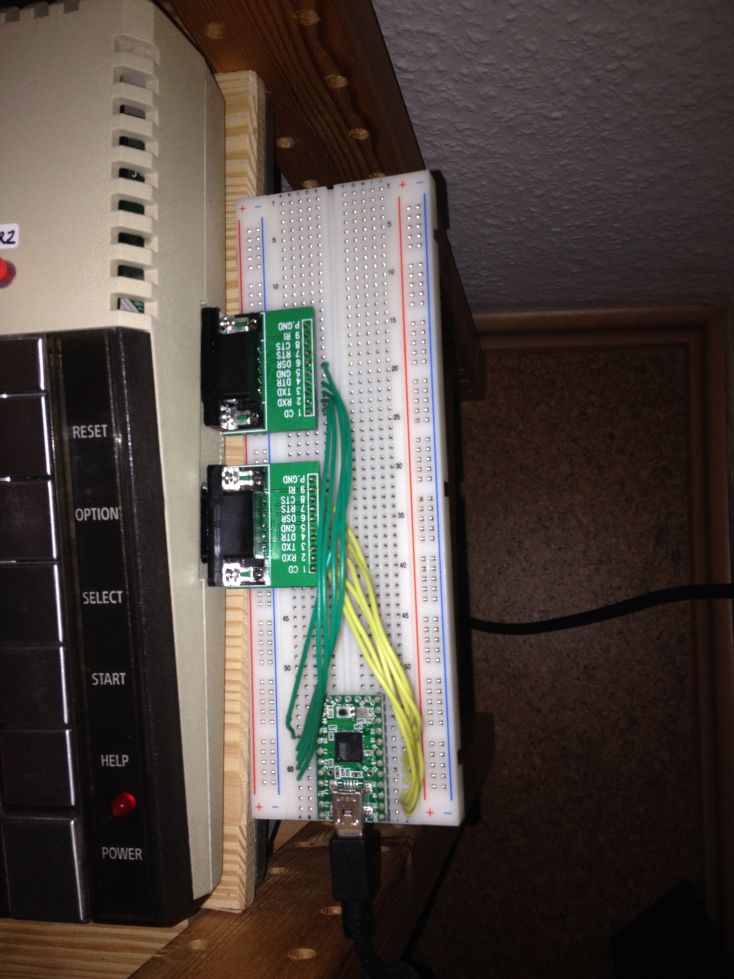
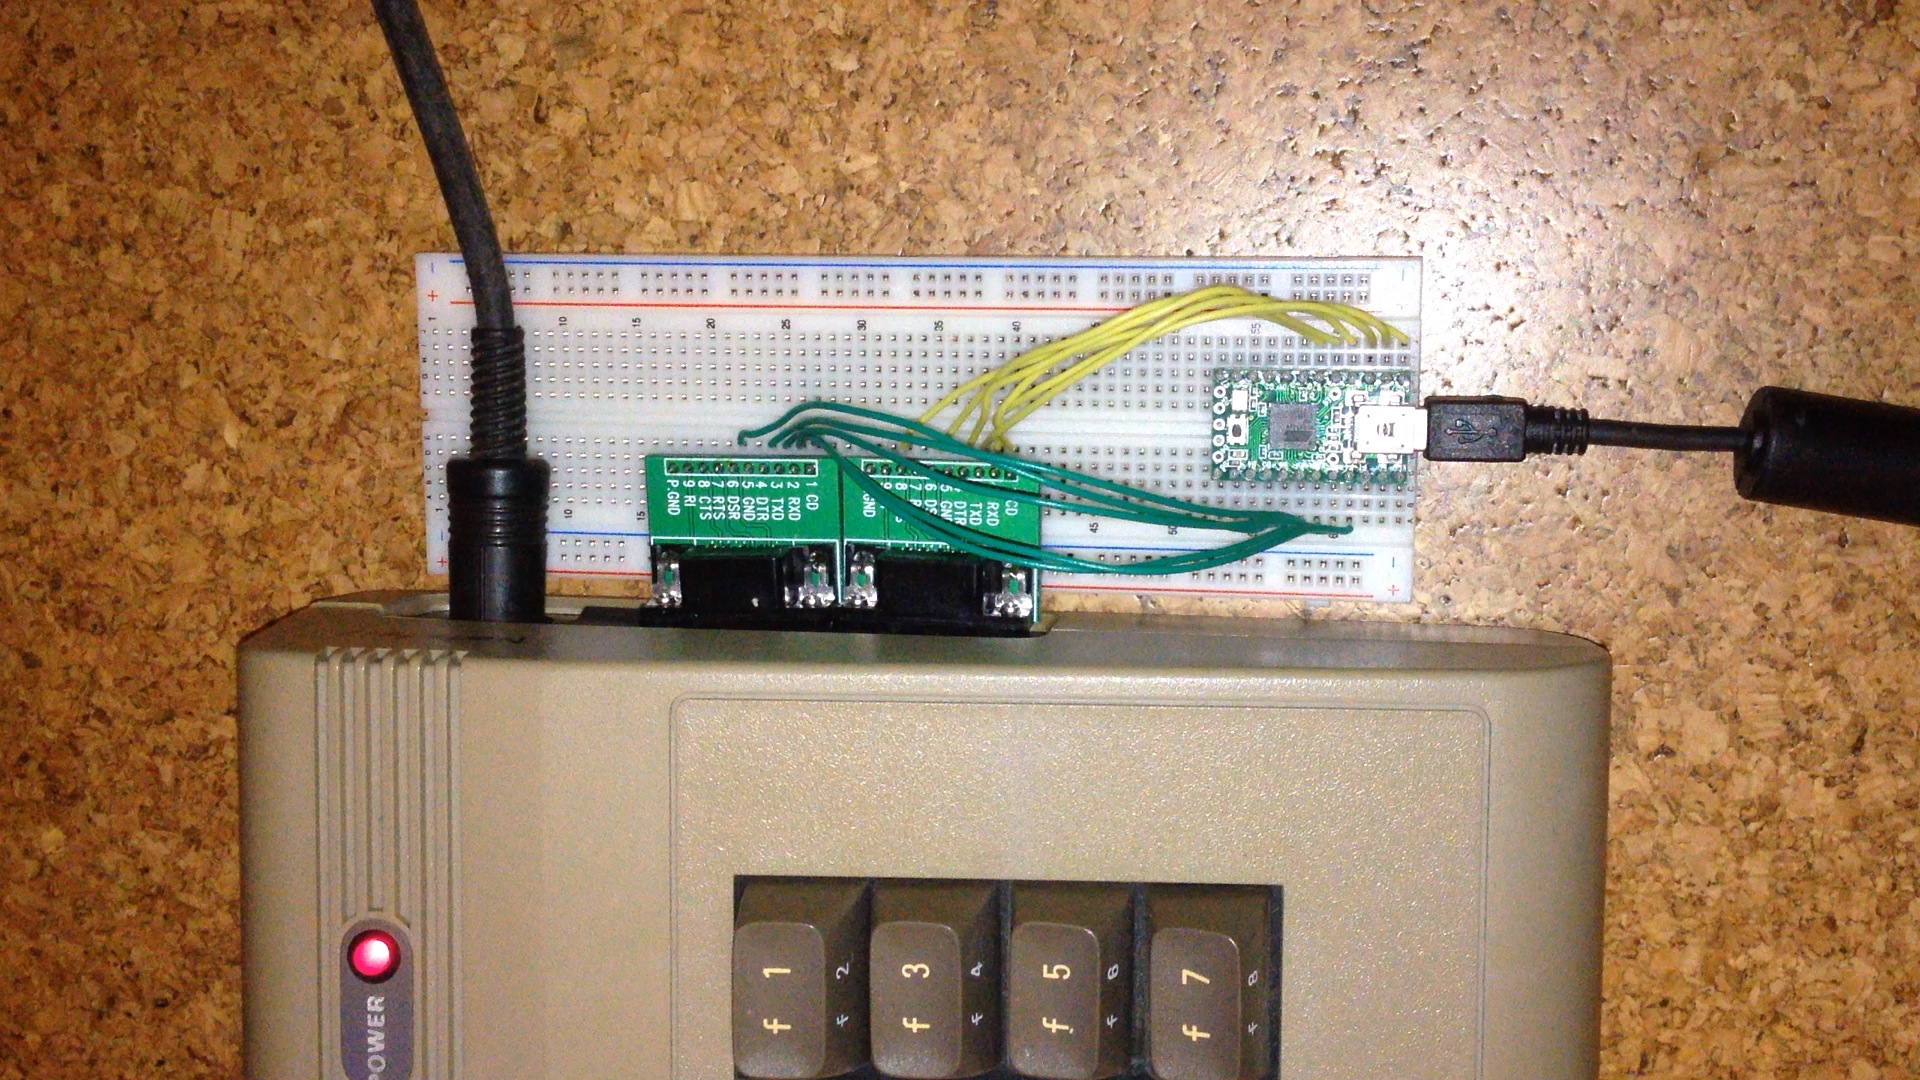
(Click images to enlarge in a new window)
To do so, one needs:
Once this is done you only need to connect the pins of the Teensy board to
the DB-9-connectors. The images above give you a good indication, but
make sure you double-check the exact pins as the perspective in the
images can be misleading. You can find the mapping in the description
at the beginning of the source code.
Setting up the interface - Printed Circuit Board (PCB)
Currently, I still have a few prototypes left from developing
which I would give away for material costs. Contact me if you are
interested.
If you want to add serial Midi functionality as well, you need to add the
following:
For German customers, a list of all necessary parts can be found
here
at reichelt.de.
DO NOT use this diode if you connect the device via USB as this
could seriously damage your PC. This diode is only useful if you use serial
("classic") Midi input only, for example if you want to connect a
Midi-keyboard directly to the Atari/C64.
If you want to use both USB- and serial Midi, you have to either prepare
the Teensy or the USB-cable you use to connect the Teensy. Instructions
how to do this can be found here.
Flashing the Teensy microcontroller
Once this is done, the interface should be detected by the Midi sequencer
software on the Mac/PC. For simply playing via your keyboard or Midi
playback, Aria Maestosa
is a great free program for Windows, Mac and Linux. For more complex
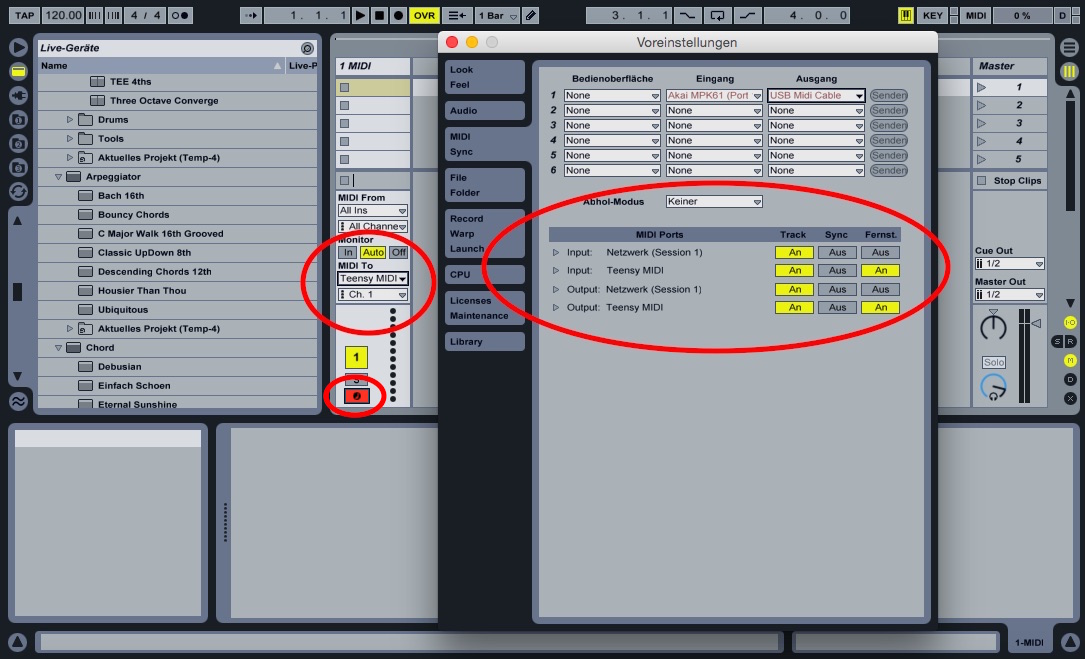
tasks, Ableton Live is a powerful alternative. See here for a sample configuration of Ableton Live.Board -> Teensy 2.0 | USB Type -> MIDI
Connecting the interface
Using MidiJoy on the Atari
All incoming data will be adjusted correctly to the Atari note table and
then played immediately. As far as possible, proper scales are used also
in distortion modes 2 and 12. Pressing the SPACE key switches between two
different scales in mode 12.
While recording, all incoming note data is saved to RAM and can then be
played back using the P key (after recording is stopped). A counter
displays the memory area used by the recording. This area can afterwards
be saved for later use by jumping into DOS (J key) and use the "Save
Binary File" function there.
This of course requires that MidiJoy has been started with DOS in the
background - simply booting the executable from a game DOS or SD-card will
not allow you to save your recordings!
ADSR/Distortion Envelopes
Actual envelope-data begins with a status byte containing the length of
the subsequent ADS-phase, followed by the ADS-envelope data. The last byte
here is special: it indicates whether the sustain phase should be repeated
from an earlier position onwards which is useful if you want to create a
vibrato and keep it going indefinitely as long as the key is being
pressed.
To do that, this byte contains the number of bytes the envelope
counter should 'rewind'. A zero means the volume will remain at its last
level, otherwise the counter will be set back by the number specified
here. Take note to count this 'rewind' byte into the status byte as
well.
Following the 'rewind' byte is the Release-phase data up to the beginning
of the next voice's ADSR-data.
If you want to use multiple envelopes during live performances, there are
eight slots available from $3400...$34FF up to $4B00...$4BFF where
envelope data can be stored and selected during playback with keys 1 to 8.
Recording format
Playback
You can play the songs from the demo disk in BASIC as well, simply boot
into DOS with BASIC enabled, load the .EXE file and jump back into BASIC.
In BASIC you can start playback with
X=USR(1536,20480,40000)
(in your own songs, the second and third parameter must match the note
data RAM area as displayed in MidiJoy). To stop/pause simply enter
POKE 207,0:FOR X=0 TO 3:SOUND X,0,0,0:NEXT X
and continue playing with
POKE 207,1
Using MidiJoy on a C64
Having never written any program for the Commodore
before, my small proof-of-concept conversion only covers the product's
main feature: live playback. And this works quite well, as the
following demo video shows (first version shown here, for current user
interface see newer demo video on the right):
Since the wave form is reset within MidiJoy, use addresses 251 to 253 for
POKEing the desired waveform to be used during playback. Otherwise (or if
MidiJoy is told to clear the SID registers prior to start) a default value
of 17 (triangle) is set for all voices.
You may press "Q" to quit the program and restart it with "RUN", for
example if you want to POKE different SID values for different playback.
Using MidiJoy on the Atari VCS 2600
Due to the irregular tonal system of the VCS which does not correspond to
our common chromatic scales, MidiJoy for the VCS consists of only one
octave that is mapped to all the 10+ octaves of the Midi standard. Even
within this one octave there are notes which are "off" and this cannot be
prevented.
However, using the VCS with MidiJoy might still be interesting for
musicians who would like to make use of the various sound effects /
distortions built into the VCS. Just change the distortion value in the
source code to something else and enable the alternative note table,
compile and you are good to go.
Using MidiJoy on other systems / sample code
It should be easy to adapt to other systems, even non-6502 compatible
processors. If feasible, sound chip specific functions as well as other
functions (such as saving data etc.) can then be added, too.
Due to the fast transmission of data through the interface, such a program
would have to be written in assemlby language in order to provide
satisfying results. Should you have written a port for a different system,
I'd be happy to link to your website or host the file here on mine.
Playing digi-samples
Here's a little demo showing playback on an Atari 800 XL (works likewise
on a C64 or VCS 2600) using the simple playback software that can be
downloaded in source as well as binary below. Take note of the change of
playback speed of the last sample, all these parameters can be controlled
directly from your Midi keyboard or sequencer:
DDRB = B00001111;
DDRD = B00001111;
with
PORTB = B00000000;
PORTF = B00000000;
PORTB = data >> 4;
PORTD = data & B00001111;
with
DDRB = ~(data >> 4);
DDRF = ~(data << 4);
Details how to play and modify the samples from your Midi device or
sequencer can be found on Sebastian's website.
Do not forget to re-flash the Teensy with the MidiJoy firmware above once
you want to use it with MidiJoy again!
Troubleshooting / Frequently Asked Questions
Because of this, each note played ist sent to the Atari/C 64 in two steps
with a 0.3ms delay. This should usually not be noticable, but if you play
a chord of four notes at the same time, each note is transferred to the
computer with a 0.3ms delay between pitch and velocity like this:
t+0: 		note 1: pitch + channel data
t+0.3ms		note 1: velocity + channel data
t+0.6ms		note 2: pitch + channel data
t+0.9ms		note 2: velocity + channel data
t+1.2ms		note 3: pitch + channel data
t+1.5ms		note 3: velocity + channel data
t+1.8ms		note 4: pitch + channel data
t+2.1ms		note 4: velocity + channel data
t+2.4ms		transmission of chord finished
There is unfortunately no way to prevent this because contrary to the
proper MIDI protocol, the joystick ports to not have a fixed (and faster)
transmission rate, let alone a transmission protocol which would work in
the way of "Ok, I'm done already, no need to wait before you can send the
send the next piece of data".
This is basically the price I had to pay for being able to realize the
live playback option. If I had gone through the "proper" IO chip of the
Atari - which is also the POKEY who does the sound - data transmission
would have been more seamless, but direct playback of the received notes
would not have been possible as the POKEY can do either data transmission
or sound playback.
Questions? Comments? Suggestions?